So my fridge needed a little something more. I had already added a chalkboard message board to it a few weeks ago. Which I love and you can see how I put it together in an earlier post. So rather than use a post it note or something else that wasn't working so well. I decided to design my own dry erase list and combine it with a weekly menu across the bottom. This made perfect sense! When I am making up my list of the ingredients I am going to need I can coordinate my weekly meals. A big plus is that I don't get that dreaded question every night about what's for dinner. My family can also easily take a peek at my list! This is a big help in making my week a little bit more organized. This was a breeze to put together with Heritage Collector Storybook. The tutorial I used to make the magnets can be found on my blog as well. The kit I used was Odl-Lay-Hee from Pixels and co.
Tuesday, January 28, 2014
Monday, January 13, 2014
Valentine Labels & Cards and a DIY Print
I love creating custom prints for my home. These two prints were designed in Heritage Collector Storybook with digital chalkboard paper and elements from the kit from Pixels and Co. Hello love elements. You can easily create your own digital prints and so much more with Storybook. Check out the link to this awesome program on the upper right.
A free online class is coming up next week. Sign up here:
http://www.heritagecollector.com/Webinar/Storybook.htm
As you know from previous posts Valentines Day is one of my favorite holidays! When I came across these darling labels on pinterest I just had to use them to make a cover for my water bottles. I thought these were perfect for gift giving and you could even add a small flavor packet to go along with the straw.
I am thinking these would be great teacher gifts this year for my kids to give at school. While I was out this week I picked up a 6 pack of water bottles at my local store. They were the perfect size for the labels.
I found the labels from Confetti Sunshine.
I printed the labels on cards stock and attached them to the water bottle. Doubled sided tape works great. Hobby lobby had a great selection of fun party straws and I thought the black and white chevron went along great with the labels.
Such a fun an easy way to show a little love to someone special this Valentines Day. Heritage Collector is a fantastic program for making your own custom labels.
Valentines created from elements from Boutique Cute Dolls. Everlasting Love and Long Live Love. I decided to create some simple black and white cards to give to friends and family. I think the pop of red heart's really catches your eye with the photo. Can't wait to give some away to family and friends!
Friday, January 10, 2014
Valentine Treat Wrap
I love celebrating Valentines Day! It is one of my favorite holidays. I have some great people in my life and I enjoy having an extra reason to take some time to show them I care. I chose to use this Valentine wrap because it is was so easy to make and you can put a variety of gifts inside the wrap. I decided to go with gum because my children are always searching through my purse for my hidden stash! Some other ideas are a gift card, favorite treats, lip balm, a favorite nail polish. Really anything that is a small enough to fit inside. I plan on giving a lot of these away during the month of February. For this project I used card stock, double sided tape for the gum, a hole punch, and a small ribbon.
To make a wrap you will need a 8 1/2 x 11 paper. I used some elements from Boutique Cute Dolls. SHe has some amazing kits in her store Oscraps. http://www.oscraps.com/shop/home.php?cat=586 I put the project together in my favorite digital program Heritage Collector Storybook. This is an example of my original copy printed. I chose to create two designs. I also printed it with a colorful print on the back side so that when you open it up there is some color. As you can see above with the gum I placed inside my wrap. You could print this on your home printer. However the quality at a local print shop comes out brighter and more vivid. I usually print mine from a local printer.
To view folding instructions they are found here on Heritage Collector Storybook's blog. http://heritagecollectorstorybook.blogspot.com/search?updated-max=2013-05-03T07:38:00-07:00&max-results=7&start=7&by-date=false
I really appreciate having a great digital program to use to create all my digital projects. If you haven't checked out Heritage Collector don't forget to take a peek! There are some amazing ideas to be found on the blog, newsletters with great tips and free classes. http://heritagecollector.com/
It was fun to put these together and I am excited to give them to my children, friends and family for Valentines Day this year. I really love finding simple projects that I can personalize and share. I hope I have inspired you to make a simple gift to show your love for the wonderful people in your life.
Coming soon Valentine photo cards.
Sunday, December 22, 2013
Happy New Year 2014 Dry Erase Chalkboard
Wow can I just say that 2013 has just flown by! This past year had some great highlights and amazing experiences. I am looking forward to many more to come for the new year in 2014! I love fresh starts and new beginnings and here we are about to start a brand new year. My goals are pretty simple and I may adjust them as the year progresses. For me I like to mix a few simple goals with others that are also long term ones. I love chalkboard art and I was happy to see this element included in BCD Dolls new release. Documenting the Everyday. I couldn't wait to use this element for my latest project! So I decided to enlarge it and laminate it so I could write on it with some fun chalkboard markers. It totally has the look of chalkboard and is easy to write on and display.
I took the element and downloaded it into Heritage Collector. If you have not yet tried out Heritage Collector you are missing out on a gem of a program! Later in this post I will share with you the links to find out more!
I also found these fun flairs in BCD Dolls kit Always Remember. I downloaded them into Heritage Collector Storybook and then I printed them on card stock. I thought the flairs would make a darling pair of magnets to hang the finished project on my fridge. If you are not inclined to put this on your fridge you can set it up on your counter top with a little easel. I have loved these fun chalkboard pens. They are a little easier to use than regular chalk. I love all the fun colors to choose from!
I took my 8×10 card stock print to a copy store and had them laminate it. I cut out the flairs. I attached the two flairs onto the round beveled glass with some clear glaze adhesive. Once it was dry I also coated the back with a dab of tacky glue and added the magnets. Pictured below is the second idea with the magnets for the fridge. It is amazing what you can do once you laminate your project. If you are also looking for an awesome program to help you create some amazing projects look no further than Heritage Collector! https://www.youtube.com/channel/UCij9En_EOhpFDnha9pwGWug
.jpg)
I am almost ready to begin a new year. Now that I have an idea of some of the things I want to do differently this year, it will be nice to have a place that reminds me of my new resolutions. Best of all I can change it or add new ideas! Don’t forget to pick up your own copy of Documenting the Everyday so you can make your own laminated dry erase chalkboard. Wishing you a Happy New Year! May it be your best year ever.

Friday, December 13, 2013
Vinyl Chalkboard Fridge Message Board
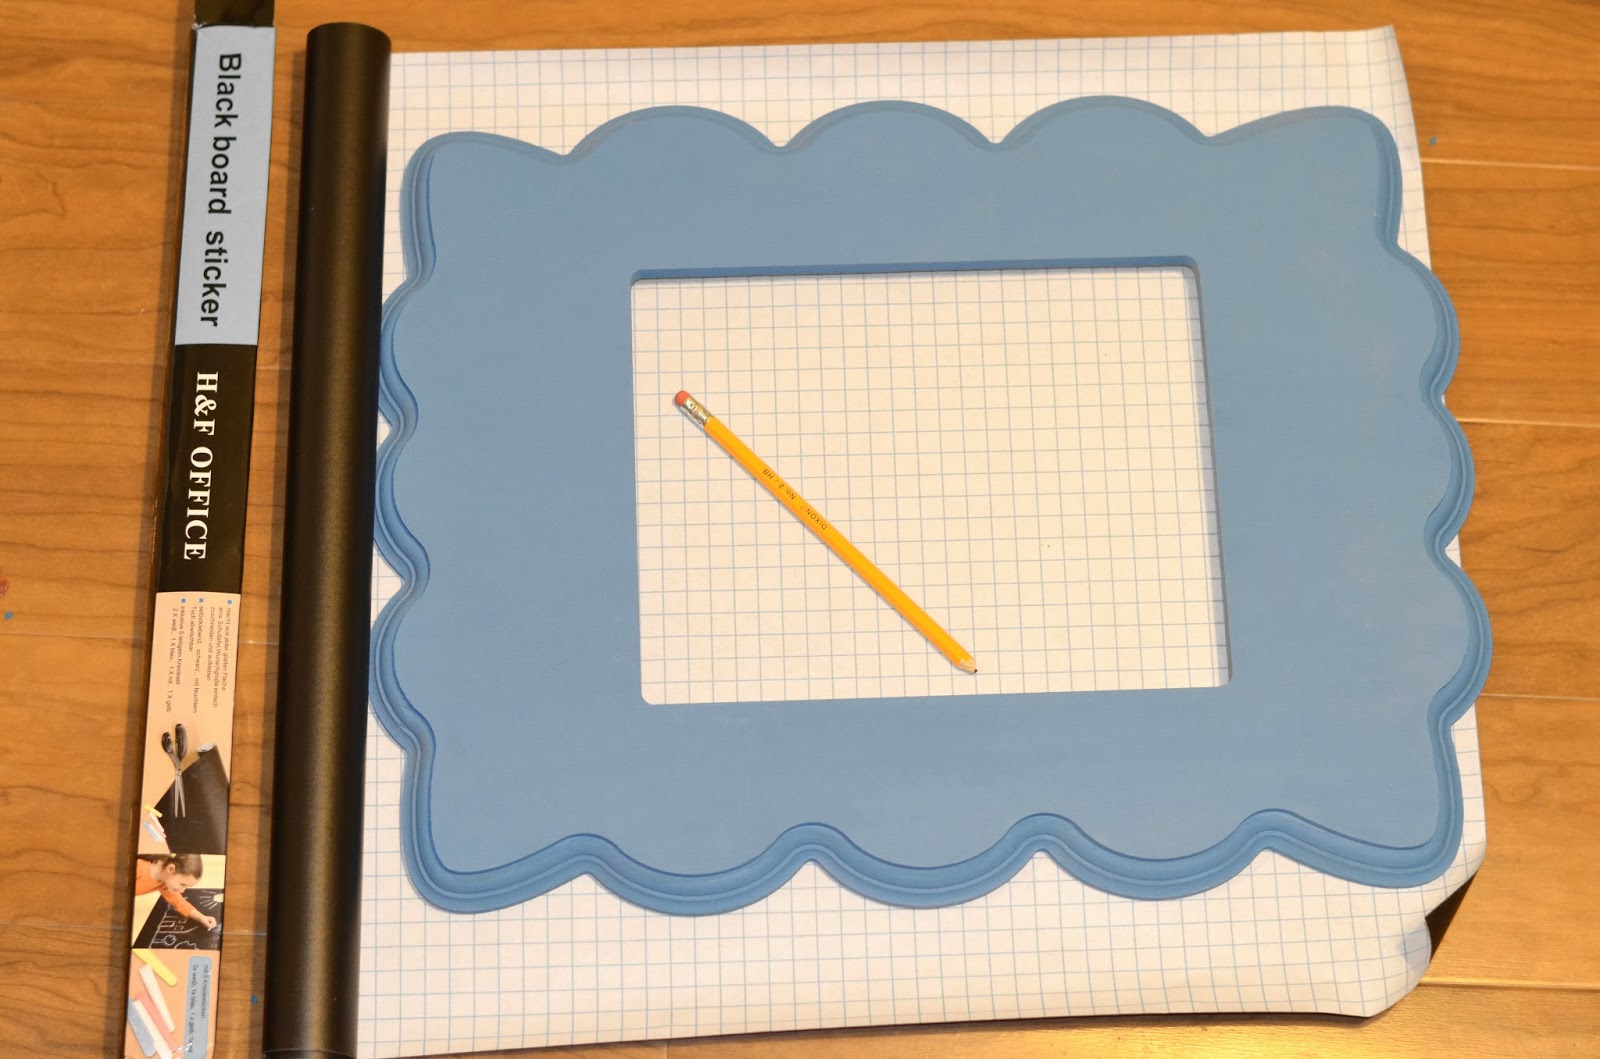
Ok I will admit it. I have been a little obsessed with chalkboard lately. I love looking at all the fun chalkboard art, cards, and framed art. I also love chunky curved frames. So when I saw this idea with vinyl combined with chalkboard I just had to create one for my fridge! So a few weeks ago I ordered a vinyl chalkboard sticker. It is very similar to contact paper.
The vinyl came in a roll with some chalk included! I traced my curvy frame with a pencil to the back of the vinyl. Then I very carefully cut it out. I gently pulled away the backing smoothing out any bubbles and attached it to my fridge. This was really so simple to create. What do you think? Are you ready to make your own vinyl message board for your fridge?
Saturday, November 30, 2013
Elf on the shelf
This is our first official year trying out Elf on the Shelf. I was excited to make up a Christmas countdown for our first day to introduce our elf and to kick off the month of December. I put together a print and decided to add a little to it to make it a bit more festive with our elf. I love Christmas time and think the fun antics of our elf Noel will make the start to each day during December more enjoyable for our children.
Mini Calendar Gift Idea
I couldn't wait to show you this fun framed mini calendar! I love a project that is simple to put together. I love making and receiving useful personalized gifts! So when I came across this darling calendar kit from Boutique Cute Dolls I just had to make some mini 3×3 calendars to give as gifts this Christmas. You can never have enough calendars around the house. I love curvy frames and chipboard. For this tutorial I made one of each. The chipboard obviously is less expensive to purchase. I thought it would be great for adding magnets to the back of the chipboard and hanging on the fridge. The wood frame would be nice to display on a desk or counter, nightstand etc. Really anywhere that you need to have quick access to the calendar.
The items I used for this project were a chipboard and a wooden frame. I chose an opening with a 3×3 size. The calendar file shows a 6×6 size. I shrunk mine down to fit the frames. I painted the wood an antique white color with a sponge brush. While the paint was drying I printed the file out on card stock and cut them out.
The items you need for this project are your choice of chipboard and a wooden frame. I chose an opening with a 3×3 size. The calendar file shows a 6×6 size. I shrunk mine down to fit the frames. I painted the wood an antique white color with a sponge brush. While the paint was drying I printed the file out on card stock and cut them out. So what do you think? Are you ready to download the 2014 calendar file and make some for Christmas gifts? I just could not pass up on making one for my kitchen counter too! Such a fun and simple way to share a great gift!
Subscribe to:
Posts (Atom)