Thursday, March 21, 2013

Treat Topper and Popcorn Recipe


I love Spring!  When the flowers start to blossom and the warm sunshine comes out after a long winter I feel happy.  This seems to bring out my creative side.  Because I was feeling some joy I wanted to share it with my neighbors and friends.  So I made some springtime treat bag toppers.


I created these in Heritage Collector Storybook in a 5.5 x 10.5 size to fit a little larger treat bag. I purchased the digital scrapbooking kit from Echo park paper on Jessica Spragues web page. The kit is called Springtime.  http://www.jessicasprague.com/index.php?page=shop.product_details&flypage=flypage.pbv.tabs.tpl&product_id=1213&category_id=10&keyword=spring&option=com_virtuemart&Itemid=295


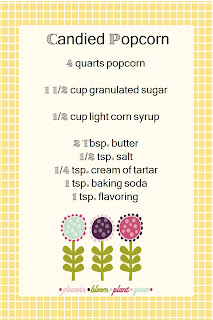
I popped up 2 bags of microwave popcorn and then whipped up some candy coating with a little yellow food coloring added. Recipe came from chocolate, chocolate and more.com.  For the flavoring I used vanilla and coconut.


Keep freshly popped popcorn warm in a large baking pan in 200 F. oven. Combine sugar, corn syrup, butter, salt and cream of tartar in medium saucepan. Cook to 250 F without stirring. Remove from heat. After boiling action ceases, add flavoring and soda. Stir in quickly but thoroughly.  Pour at once while foamy over warm popcorn.  


The kids and I love this popcorn and what better way to share it wrapped up with a cute spring topper! These would also be fun to mold the popcorn while still warm into an egg shape in any color you choose.

Monday, March 18, 2013

Dry Erase Shopping List


I have been working on a little more organization when it comes to grocery shopping.  I seem to end up writing a list several times.  I decided that creating an erasable menu planner and shopping list that I could write on the fridge and then take with me to the store worked great.  If you are worried about the ink smearing you can slip it into a zip lock bag or write on it with permanent marker that easily wipes off with a little rubbing alcohol.  I have found that a fine point works the best for writing.  I attached a simple magnet to the back so I could have this on the fridge for easy access as I remember what I need to put on my list. This method also works great for the kids to make a note of something they need if I am not nearby.


I created this in Heritage Collector Storybook.  Completed dimensions are 6x4.  I printed on card stock and had it laminated.  A little glue and a round magnet to the back made it perfect!  Below is the finished project. The cards were designed with a kit from Lori Whitlock from Jessica Sprague.


Saturday, March 16, 2013

St. Patricks Day Treat Bags


Tomorrow is St.Patricks Day.  Although I don't have any Irish ancestry I love the holiday.  I found this idea and just had to design a topper to complete the treat.  It was really fun to make.  I found a digi kit called "lucky" and designed a 4.5 x 4.5 inch topper.


 I picked up some twizzlers in rainbow colors.  For the gold you can use chocolate gold coins or rollos.  I had some clear bags that fit the dimensions of my topper.


Here is the finished treat.  I thought they turned out great.  I'm sure my kids will enjoy eating them.  You could also fill the bag with green rice crispy treats or colored popcorn.  Whatever your kids like.  Hope you have a fun day!


Sunday, March 10, 2013

Teacher Appreciation Week


This past week my kids came home from school with a note  reminding me that teacher appreciation week was coming up.  I really have fun making up gifts.  I downloaded some fun spring graphic kits this past week from Echo park paper from Jessica Sprague.  I think these ones are from Deena Rutter and Lori Whitlock.  I was looking for an excuse to make something so this project worked great.  It would be fun to add these to a framed 8x10 magnetic board.  I may attempt to make one later this week.


Supplies needed for this project:  Clear glass rounds, scrap book paper, card stock, clear cello bag, modge podge, glue, and magnets.  I designed a 4x4 topper to fit a 4-8 inch bag and glued some matching paper from the same kit  to clear glass rounds. I let these dry and then added a magnet to the back. I then cut out some white card stock and taped each finished magnet on the page. In an earlier post I also made some of these for birthday gifts.  The toppers can easily be switched out to say anything you want.  All at the touch of a button in Heritage Collector Storybook.

Here is a closeup of the completed project


Today we made up some personalized thank you cards to go with our gift.  These were super easy to make. I used the coordinating graphic kits to design and print a 4x6 photo card.


We love our teachers!  It was fun to put together a personalized unique gift for each of my children to give.

Thursday, March 7, 2013

Wristlet Camera & Key Fobs

A hobby that I began last summer at a boutique has been a great way to make something handy for my portable camera's. Wristlet key fobs and DSLR camera strap covers.  I love taking photos and it has been fun to add a little pop of color and comfort to my camera's strap.  Not to mention that they make a great gift!


I use these for my car keys, hd video recorder and my camera.  They make it so easy to find and store when not in use.  I no longer have lost or missing car keys since adding them to a wristlet strap.  These are made with durable cotton webbing and a cotton duck fabric or quality cotton blend.


I sell these to family and friends.  They make a great gift for a teacher, friend or photographer!  Message me if you would like more info.


Laminate Dry Erase Calendar


I am so happy with how my dry erase laminated calendars turned out.  These were a breeze to create using Heritage Collector Storybook software!  I chose an 11x14 inch layout.  I wanted something I could put on the fridge for menus or for keeping track of day to day events.  Once they were complete I had them printed at Costco.  


Laminating them was easy too.  Alpha graphics had them ready to go within minutes.  Once they were ready I attached four magnets to the back of each one.  For writing on them I use a fine point dry erase pen.  These types of pens come in many colors if you want to color code for children etc.  


The completed project!  I also sell these at Copy That in American Fork Utah.  Message me for more info.  You can make your very own using the calendar module in Heritage Collector.


This last pic is of a framed 20x16 print. Instead of being laminated I write over the glass.  Basically the same concept.  We use this as a family event and menu board.  It has worked great!